Search This Blog

Saturday, March 31, 2012

3.31.12

I love my wok.  I don't use it nearly enough. Mostly because I have to store it in a cabinet above my refrigerator and my angel food cake pan (which I also don't use nearly enough) and my 2nd-oldest-brother-made lazy susan (only used on taco night) is stored on top of it.

Tonight's dinner also reminded me how much I truly love bok choy. I didn't use enough in tonight's stir fry. And, as you can see from this picture, I had a lot of bok choy to use.


My stir fry secret comes from an inspired article in Food Network Magazine (I think it was the March 2010 issue). They lay out a "system" where you can choose a protein, veggies, and then give you recipes for several different kinds of sauces. Tonight we had chicken, carrots, broccoli, celery, mushrooms, pea pods, and bok choy. I used the recipe for the "clear sauce" and served it over rice.


Pick a Protein

¾ lb flank steak, trimmed and thinly sliced against the grain
¾ lb skinless, boneless chicken breasts or thighs, thinly sliced
12-oz package extra firm silken tofu, cubed
¾ lb pork tenderloin, thinly sliced
¾ lb medium or large shrimp, peeled and deveined

Marinate

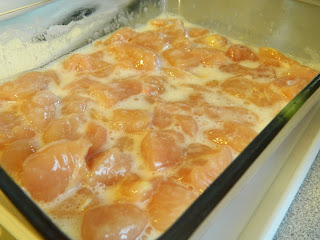
Whisk 1 egg white, 1 T Chinese rice wine or dry sherry and 1 T cornstarch. Toss with your protein; cover and refrigerate, 1 hour.


Prep 3 cups of vegetables (in any combination)

Sliced carrots                             whole snow peas
Sliced celery                              sliced asparagus
Sliced bell peppers                   quartered plum tomatoes or
1 inch scallion pieces               halved cherry tomatoes
sliced onions or shallots           baby spinach
quartered mushroom caps       blanched broccoli or cauliflower florets
sliced bok choy or cabbage     thawed frozen peas or edamame
sliced leeks                               

Choose a Sauce

Clear Sauce: Mix ¾ cup chicken broth, 1 T cornstarch, 2 T Chinese rice wine or dry sherry, ½ t sesame oil, 1 t salt and ½ t sugar

Sweet-and-Sour Sauce: Mix ¾ c chicken broth, 2 t cornstarch, ¼ c ketchup, 2 t soy sauce, 3 T rice vinegar, ¼ c sugar, ½ t salt and 1 t sesame oil

Brown Sauce: Mix ½ c chicken broth, 1 T cornstarch, 1 T soy sauce, 1 T hoisin sauce and 1 T Chinese rice wine or dry sherry.

Oyster Sauce: Mix ¾ c chicken broth, 1 T cornstarch, 1 T Chinese rice wine or dry sherry, 1 T soy sauce, 3 T oyster sauce and 2 t sesame oil

Spicy Sauce: Mix ¾ c chicken broth, 1 T cornstarch, 2 T each soy sauce, rice vinegar and Chinese rice wine or dry sherry, ½ t sesame oil, 1 T sugar and 2 t Asian chili sauce

Stir-Fry

Drain the excess marinade from the protein. Place your sauce, vegetables and protein near the stove.

Heat ¼ in peanut or vegetable oil in a wok or skillet over medium heat. Add the protein; slowly stir until almost opaque, 30 seconds to 1 minute (for tofu, brown on both sides—do not stir). Transfer to a plate; discard the oil and wipe out the pan.


Heat the pan over high heat, 1 to 2 minutes. Add 2 T oil, then 2 cloves minced garlic (or 4 cloves if using spicy sauce), 1 to 2 t minced ginger, 2 minced scallions and a pinch of salt and sugar; stir-fry about 30 seconds. Add the vegetables, starting with the ones that take the longest to cook; stir-fry until crisp-tender.

Add the protein and the sauce and stir until the sauce is thick and the vegetables and protein are cooked through about 3 minutes. 


Thin with chicken broth, if needed. Garnish with sliced scallions, peanuts, sesame seeds, sliced jalapenos and/or cilantro.


So tasty, my daughter actually at bok choy tonight!

Wednesday, March 28, 2012

03.28.12

Sometimes I just love easy-peasy 4-ingredient dinners.


Really, really love them. Tonight, since it was our second afternoon of ballet this week, it was great that I could make these Chicken-Bacon Bundles ahead of time. When we got home from ballet they got popped in the oven and 20 minutes later dinner was on the table. This idea came from Quick Dish by Tablespoon but I altered the assembly of them just a bit.

Cheesy Chicken and Bacon Bundles


4-6 slices of thick-cut bacon, cooked till crisp and crumbled
3/4 c shredded cheddar cheese (I used a Mexican Blend--not seasoned)
1 c cooked chicken, cubed
1 can of refrigerated crescent rolls

Roll out the sheet of crescent rolls and press the seams to seal them a bit. Cut the sheet of dough into 8 rectangles.


Using one crescent dough rectangle at a time, pile up a little shredded cheese, then bacon, the chicken, then more cheese.


Bring the corners of the rectangle up to the center and press them together to form your bundle.


I refrigerated them until I was ready to cook them--about 4 hours.

When they are ready to bake, preheat oven to 375°. Place the bundles on a cookie sheet lined with parchment. Bake for 18-20 minutes until golden brown.


Look delicious, right? They were!  I served them with a huge green salad. Great dinner.

I'm thinking that this idea could really work for many fillings:
  • chicken, cheese and broccoli
  • leftover steak, cheese, and mushroom
  • chicken in gravy and mixed vegetables
  • chicken or steak fajita bundles


I'll keep thinking of more....

Sunday, March 25, 2012

03.25.12

I have an awesome baked coconut shrimp recipe that I use often (I'll include it below). So, when I saw this recipe from a blog called Budget Bytes I just had to try it. It was tasty! Although I probably won't make it often as I'm trying desperately to cook fried food for the family infrequently. I might attempt to adapt my Crispy Chicken Nuggets recipe and bake these tasty morsels next time.

The recipe called for sweet chili dipping sauce. I found this easily in the Asian foods aisle at my local grocery store. I usually serve my coconut shrimp with a sauce made from orange marmalade, a splash of cider vinegar and a touch of Thai chili paste. So, I served both tonight.


Coconut Chicken with Sweet Chili Dipping Sauce


Ingredients:

3 boneless,skinless chicken breast halves
2 large eggs
¼ c coconut milk
½ c flour
1 c panko bread crumbs
1 c shredded coconut pulsed in food processor
½ t salt
½ c vegetable oil, divided
1 c sweet chili sauce

Directions:

STEP 1: Cut off any extra fat globules from your chicken breasts. Cut each breast into 6 strips, diagonally to prevent the end strips from being really short.
STEP 2: Prepare your breading station by gathering three bowls. In the first bowl combine the flour and salt. In the second bowl, combine the eggs and coconut milk. Whisk together until well combined. In the third bowl, stir together the panko bread crumbs and shredded coconut.
STEP 3: Place 1/4 cup of vegetable oil in a large heavy duty skillet and heat over medium/high heat until it is just below smoking.
STEP 4: While the oil is heating, dredge the chicken strips. First, coat each strip in the flour and salt mixture. Then dip each into the eggs/coconut milk and finally coat each in panko and shredded coconut.


STEP 5: After breading the strips, the oil should be hot enough. Place about 6 strips in the pan at once. There should only be one layer in the pan and there should be about an inch between each strip. If you over crowd the pan it will get too cold and the strips will soak up a lot of oil instead of frying. Fry the strips for 2-3 minutes on each side or until they are golden brown and crispy. 


Place them on a plate with paper towel to drain and move on to the next batch. After a couple of batches you may need more oil so you can add the second 1/4 cup to the pan. Allow the oil to come up to temperature before frying the next batch (2-3 minutes). Because the strips are thin, they should be cooked through by the time both sides are browned
STEP 6: When all of the strips are done frying, serve immediately with sweet chili sauce to dip in.


Baked Coconut Shrimp

Ingredients:

2 egg whites
1 ½ cups panko bread crumbs
½ teaspoon cumin
¾ cup shredded coconut
1 garlic clove, minced
pepper
24 large or jumbo shrimp, peeled, deveined, butterflied

Directions:

1. Preheat oven to 500°F.
2. Line a rimmed baking sheet with parchment paper.
3. Beat egg whites in bowl.
4. In a small plastic bag, mix panko, cumin, coconut, garlic, and pepper.
5. Dip shrimp in egg whites, then shake in plastic bag to coat (press coating onto shrimp a bit to make it stick.)
6. Lay shrimp on baking sheet and bake about 12 minutes until golden brown.
7. Serve with dipping sauce: 1/2 cup orange marmalade, splash of cider vinegar, ¼ t chili paste    


Tuesday, March 20, 2012

03.20.12

Well, it seems I need another kitchen tool: a tortilla press. Seriously, did you ever think this Italian-momma, who had an Italian-momma (okay, Italian by marriage) would be hand making whole wheat flour tortillas and now corn tortillas??

My husband asked me if it was easy. My response? "I thought that the flour tortillas were easy. This was stupid-easy!" And I swear I will never use a store-bought corn tortilla again. What was I thinking all these years?

The most difficult thing about this new project was finding the masa harina. Since I didn't exactly know what I was looking for I first bought a package of masarepa. Then I did some research on masa harina. Before the corn is ground it is treated with lime which gives the masa harina it's distinct tortilla flavor. The lime also reacts with the corn and allows niacin to be absorbed. Bonus! I eventually found masa harina at a market in town under the name "Maseca". I had originally found a recipe for corn tortillas online, but I ended up using the recipe on the bag of the Maseca bag.

Corn Tortillas (makes 16 six inch tortillas)

2 cups Maseca
1 1/4 cups water
1/2 tsp salt

Mix the maseca and water until it forms a loose dough. Add a tablespoon of water if you think it is too dry. Use your hands to bring the dough together and then form 16 balls of dough. Keep these balls under a damp kitchen towel while you form your tortillas.


Preheat a cast iron skillet on medium high heat. Place one ball between two sheets of plastic wrap, press it into a disc, then roll it out until it is about 6 inches in diameter. I never got the tortillas to be round. But, they looked pretty decent.


When your skillet is hot place the tortilla in the skillet and cook it on one side 50 seconds, flip it over and cook it another 30 seconds. I woefully undercooked the first couple of tortillas. Make sure your skillet is HOT and cook the first side until the tortilla is a bit puffy and a little browned.


Keep your cooked tortillas warm under a towel on a plate. I made enchiladas out of mine about an hour after I made the tortillas. I'm sure they would keep in the refrigerator or freezer for a while if you kept them airtight.


I used a recipe from Joyful Momma's Kitchen for these White Chicken Enchiladas with sour cream and green chile sauce.  I also made some flautas for the kids (they are against anything saucy) by filling the tortillas with some plain chicken and monterey jack cheese, rolling them up and frying them in a small amount of canola oil. They came out crispy and tasty...my husband ate the ones the kids didn't want, dipping them in the enchilada sauce that was left in the dish!


Friday, March 16, 2012

03.16.12

Tonight I made delicious BLT sandwiches using our freshly made whole wheat pitas (well, freshly made yesterday.) These were no ordinary BLT sandwiches. I used a recipe for slow roasted tomatoes from a blog called "not without salt". The slow roasted tomatoes and the accompanying basil mayonnaise made these BLTs extraordinary.


Slow Roasted Tomatoes


6-8 roma tomatoes (no need for them to be really ripe)
a few thyme sprigs
1 Tbsp olive oil
salt

Preheat oven to 225° and prepare a rimmed baking sheet with parchment paper.

Slice the tomatoes about 1/2 inch thick and lay them on the parchment paper. Sprinkle the tomatoes with the thyme leaves, drizzle with the olive oil, and add just a touch of salt.

Roast for about 4 hours. Let the tomatoes cool on the baking sheet.

The authors of "not without salt" suggest putting any leftover tomatoes into olive oil and keeping them in the refrigerator. We didn't have any tomatoes leftover!!


Since tomorrow is St. Patrick's Day, I had to make a loaf of Irish Bread. I don't have a stitch of Irish blood in me, but I make this Irish Bread every year. My mom did too. She always made loaves for my and my 4 brothers' teachers every St. Patrick's Day. I don't know why.

I don't think this is a secret family recipe, and I love it a lot. So I'll share it here.

Irish Bread


3 cups all purpose flour
1/2 tsp salt
4 tsp Baking Powder
2 Tbsp butter or margarine--softened
3/4 cups granulated sugar
1 egg
1 1/4 cups milk
1 cup golden raisins
2 tsp caraway seeds

Preheat the oven to 350°. Lay parchment paper in a standard size loaf pan--covering the bottom and two long sides with overhang on each side. Use cooking spray on the exposed sides of the pan. (I use this technique on all quick breads I make--zucchini bread, banana bread, pumpkin bread. When the loaf comes out of the oven, simply grasp the overhang of parchment and lift the bread right out of the pan.)

Mix all of the ingredients in a large bowl.  Spread the batter in the pan. Bake for 1 hour. Remove the bread from the pan and allow to cool slightly before cutting.

I couldn't wait until St. Patrick's Day to cut into the loaf


Thursday, March 15, 2012

03.15.12

I am on a quest to provide more whole foods to my family. Granted, I still buy Pepperidge Farm Goldfish crackers, and Nutter Butter Peanut Butter Sandwiches every so often. But, I figured I'd take every opportunity I can to make things with real ingredients and whole grains. So, today I tackled homemade whole wheat pitas. I got the inspiration and the recipe from Annie's Eats a few weeks ago. Since then, I've been on the search for whole wheat bread flour. I researched and found that, although I could have just substituted whole wheat flour, but the bread flour makes the bread have a better consistency. I was off to find whole wheat bread flour. I scoured the town (I live in a BIG town! The largest town in the country, by the way.) I even had my trusty sidekick, Nicole, scope out a market for me. She actually went there twice and finally delivered a bag of whole wheat bread flour to me yesterday. I was so excited! I knew that today would be the day my family would dine on wheaty goodness.

With plenty of time to mix, rise, form, rest, bake I got my recipe out and started to make the dough for the pitas. Um, turns out the recipe just called for 1 1/4 cups of wheat flour and 1 1/4 cups of bread flour. I didn't need whole wheat bread flour after all. Oops. Sorry Nicole.  The final product was awesome. All without the help of any white flour. Go whole grains!

The recipe also calls for instant yeast. Again, with a little googling, I found out that I didn't need instant yeast, as long I proofed the yeast in some of the water before mixing the dough.

Whole Wheat Pita Bread (from Annie's Eats)
makes 8 medium sized pitas


Ingredients:
2¼ tsp. instant yeast
1 tbsp. honey
1¼ cups warm water (105˚-115˚ F), divided
1½ cups bread flour, divided
1½ cups whole wheat flour, divided
¼ cup extra-virgin olive oil
1 tsp. salt
Cornmeal, for sprinkling

Directions:
In the bowl of a stand mixer, combine the yeast, honey and ½ cup of the water.  Stir gently to blend.  Whisk ¼ cup of the bread flour and ¼ cup of the whole wheat flour into the yeast mixture until smooth.  Cover the bowl with plastic wrap and set aside until doubled in bulk and bubbly, about 45 minutes.


 Transfer the ball of dough to a lightly oiled bowl, turning once to coat, and let rise in a warm draft-free place, about 1 hour, until doubled in bulk.
Remove the plastic wrap and return the bowl to the mixer stand, fitted with the dough hook.  Add in the remaining ¾ cup of warm water, 1¼ cups bread flour, 1¼ cups whole wheat flour, olive oil and salt.  Knead on low speed until the dough is smooth and elastic, about 8 minutes. 


Place an oven rack in the middle position.  Place a baking stone in the oven (if using) and preheat to 500˚ F.
Once the dough has risen, transfer to a lightly floured work surface, punch down the dough and divide into 8 equal pieces.  Form each piece into a ball.  Flatten one ball at a time into a disk, then stretch out into a 6½-7 inch circle.  Transfer the rounds to a baking sheet or other work surface lightly sprinkled with cornmeal.  Once all the rounds have been shaped, loosely cover with clean kitchen towels.  Let stand at room temperature for 30 minutes, until slightly puffy.

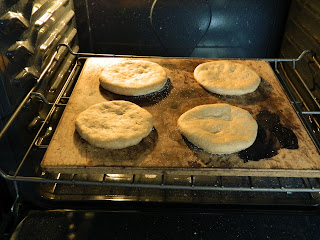
All 8 pitas didn't fit on on baking sheet!

Transfer 4 pitas, 1 at a time, onto the baking surface.  (Note: These can be baked on a baking stone or directly on the oven racks.  I use a pizza stone, but either method is fine.) Bake 2 minutes, until puffed and pale golden.  Gently flip the pitas over using tongs and bake 1 minute more.


Transfer to a cooling rack and let cool completely.  Repeat with the remaining pitas.  Store in an airtight container for up to 3 days.


Dinner tonight was some roasted chicken an a green salad topped with fried goat cheese. Yes, FRIED goat cheese.

Fried Goat Cheese

You will need

1 egg, beaten
1 "log" of goat cheese sliced into 1/2 inch slices
1/2 cup of panko bread crumbs
2 Tbsp all purpose flour
3 Tbsp canola oil

(Note: To cleanly slice the goat cheese, run a very sharp knife under hot water between slicing each piece.)

Set up a "coating station" with your goat cheese slices, a small bowl for your flour, your beaten egg, and a bowl with your panko crumbs.


Dip each slice of cheese into the flour, then the egg, then the crumbs.  In a small sauté pan, heat oil over medium high heat. When you can drop a bread crumb into the oil and have it sizzle, place the slices of coated cheese into the pan. Cook for about 2 minutes on each side until they are golden. Remove from the pan and drain on paper towel.

I like to use these gooey, crunchy nuggets to top a green salad.